Friday, August 21, 2020

It’s Time for BlytheCon!


The first online BlytheCon! We are excited to be a part of it!

Here are a few of my offerings—


And I have a few of my new EyeChip Collection available—


For BlytheCon attendees I will be offing a special discount with an exclusive code — and

a free pair of tights with every purchase!

(Also, keep your eyes peeled all weekend, as I will be randomly listing grab bags of vintage dress lots from my personal collection!)

See you there!

Monday, August 17, 2020

Outrageous Brownies with Peanut Butter Swirl Recipe


With all the home baking we've been doing lately, we've developed some favorite recipes.  And this is a big favorite!

Plus, we dote on peanut butter in our house.  All of us, including the puppy and kitten love it!  Peanut butter and chocolate is a perfect combination.  (Just don't share the brownies with your beloved pets!)  Since I do share peanut butter with my animals, I often buy the natural, sugar free, salt free organic type.  I have come to love the more authentic taste, too.  There are lots of good brands of this type available, such as Kirkland from Costco, Whole Foods 365, Adams, Trader Joe's, etc.  These types tend to be more runny than processed peanut butter, so we can sweeten it up with some confectioner's sugar to make a great filling.  The sugar combines with the oil and quickly firms up the peanut butter, so I add a bit of half and half to thin it back down a bit toward filling consistency.  It's up to you how firm you want it. 

I buy Ghirardelli Cocoa powder.  It has a great flavor.  But I prefer the Guittard chocolate chips.  They have a great flavor and a smooth velvety texture, not waxy.  Adding a cup pf these chips into the brownie batter before spreading it in the pan would really make these brownies over the top!

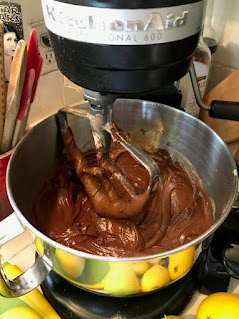
Mixing the brownie batter


Brownie batter in pan


Filling spooned and swirled on top


Outrageous Brownies with Peanut Butter Swirl


Ingredients


         Brownies

1 c. butter melted

2 c. white sugar

1 T. vanilla

4 eggs

1 c. all-purpose flour 

2/3 c. Ghirardelli unsweetend cocoa powder

1/2 t. baking powder

1/w t. salt


            Peanut Butter Filling 

3/4 c. runny organic peanut butter, such as Trader Joe’s, Kirkland, or Adams

1/2 c. confectioner's sugar

2 - 4 T half and half

1 t. vanilla


Directions


  1.  Preheat oven to 350 degrees.  Grease a 9 x 9 inch baking pan with butter.


  2.  Mix together melted butter, sugar, and vanilla.  Beat in eggs one at a time.  

    Combine flour, cocoa powder, baking powder, and salt then gradually stir 

    into sugar/egg mixture until well blended.  Spread batter into buttered pan.


  3. Make filling:  mix peanut butter and confectioner’s sugar.  

    Stir in enough half and half to make the filling workable.  

    This depends on how runny the peanut butter is to start with.  

    I like to use it all so that the filling is more spreadable.  Stir in the vanilla.  

    Dot the peanut butter filling by spoonful around the top of the brownies in the pan.  

    Swirl a bit with a knife, if you like.


  4. Bake for 35 to 40 minutes, or until the brownies start to look done at the edges and the center is set. 

    Cool as long as you can wait.  


    Attack!


Monday, May 18, 2020

Fun At Home Project


Looking for a fun project to do at home?  I've posted about this in the past, but maybe it's time for a little reminder.  It's always fun to make your fave girl a new hat!  Since summer is approaching around here, I decided on a classic turned up brim hat in a bright, rich pink.


This is a pattern that I have made before.  And it's still available for free on Ravelry here.  This is a tried and true pattern.   I found some yarn in my bin, since all the stores are closed now.  But plenty of stores are still open for online shopping.  You will need a wool that is not treated for washing.  I like this yarn, because the fibers are fairly loose in one strand.  This is a fast knit, a small project on large needles.  I really love this brand of needles.


The hat will come out ridiculously large.

Now we are ready to felt.

I use two bowls and a pair of thick extra large gloves to insulate against the heat.

Fill one bowl with an ice bath and get the hat cold and wet.


Then fill the other bowl with very hot water and a splash of detergent.  Squeeze the cold hat out and put it in the hot bath. Start scrubbing it good.  You need to get it very hot.  Start breaking down those fibers.


Back into the cold water.  Add a few more ice cubes if necessary and get it good and cold.  We want to give those fibers a big shock.  Now squeeze it out and put it back into the hot water.  Pour more water from the kettle on it.  You don't need to add more soap.  It will foam up enough.  Keep working on those fibers, swishing it around and scrubbing together between your hands.  Once the process begins to happen, it will move along fairly quickly.


Once it looks close to the right size, rinse it will and check it out.  I have a doll I try them on.  She's a little fakie that doesn't mind getting a bit wet (unlike the vintage Kenner pictured here).  But you can cover the dolls head with plastic wrap or a bag before putting the hat on her to check for size.  Since this is wool, it sheds water, so it is fairly dry right out of the rinse stage.

I shape it with my fingers.  I push it all the way down on her head to get that nice perfectly shaped crown.  The pattern is for a completely rolled brim, but you can shape it into a turned up brim.  It can even be shaped into a cloche shape.  This pattern is super versatile.  Be very detail oriented about the shaping before and while it is drying, because this is exactly what you will get when it dries.  I find it quite moldable, like finger pinching clay.


 After I have shaped it exactly as I want it, I allow it to dry perched on a glass.


Finally I give it a pretty ribbon for a hat band and few flowers in the back.

My girl is ready for a breezy summer afternoon!

Give felting a try!


Thursday, November 15, 2018

BlytheCon Minneapolis! I'm vending!

BlytheCon Minneapolis!!!

Art by Stephen Egts

I'm super excited to announce that I was selected to vend at BlytheCon Minneapolis.   

The theme of this con is the roaring '20s/Gatsby and Prince.  Here's the website with all of the details--http://www.blytheconmpls.com/.   And the super artist for this event is Stephen Egts.  I'm so excited that Jen Furman is the web designer.

This year the event will be over 2 days Aug 24 & 25, with the premeet and cocktail party on the first day and the shopping and socializing on the second day.. Everything will be held at the held at the Hilton Minneapolis/St Paul Airport Mall of America  at 3800 American Boulevard East Bloomington, MN 55425.
I'm already coming up with some ideas.  I have decided to make a much more limited selection, so that I don't drive myself batty for months prior to the event, with several different dress designs and just a few special hats.  I'll keep you posted when ideas ceome more solid and production begins.

Thanks for all of your support!

Tuesday, September 25, 2018

Tiki Doll Designs Collection for BCLA: thoughts on inspiration and perspiration

Forever Summer


I am so excited to be vending at BCLA this year!  This is my first time vending, and it has been a lot of work.  I spent time thinking about my collection, what I do best, as well as current trends and interests.  For some time now, I have been working on patterns from other designers and Japanese magazines. There are so many that I have always wanted to try, so I decided to just go for it and make them for myself and to share with others, too.  I do tend to add my own twist to these patterns. And every dress is a unique creation.


First off, the big news for me is that I have a new logo for BCLA! I am just thrilled with it! A very big thank you to Jen Furman at Jen Spectacular for my awesome logo. Look for it on my packaging, signage, cups, and pins.
 
New logo designed by Jen Furman
Summer Sundress Collection by Tiki Doll Designs
The Summer Sundress Collection is based on a Cindy Sowers pattern.  The pattern is available on Etsy as a download here. I used high end imported fabrics, such as Swiss batiste, gauze and eyelets.  All the fabrics start out as white. After making the dress, each one is individually hand-dyed using a variety of different dye techniques to achieve the varying dye patterns. Then the dye is set, and they are washed and shaped to dry.  After they are dry, I embellish each with Japanese glass beads and a bow, which has been specifically tied and dyed to go with the dress. They close in the back with a single snap. I feel these dresses are at the very heart of the Tiki Doll brand, glam summer forever exotics in jewel tones.


The Big Valley
Another pattern that I enjoyed playing with was the popular Tirin and Katten pattern.  It is also available as a download on Etsy here. I used this pattern for two different concepts.  The first, I call The Big Valley. Since BCLA is based on Hollywood, these dresses reflect the classic television show, a Western set in Central California. Created from vintage fabrics, silk, and chambray and embellished with detail stitching, leather belts, and real gemstone and pearl accents, these dresses evoke the spirit of the classic Western appeal.
African Wax Print Dresses


I also used the T&K pattern in a series of African inspired dresses.  I was lucky enough to find some superb African wax prints at a local designer fabric boutique.  Inspired by these traditional fabrics paired with silks and batiks, I am excited to offer a limited line of dresses as an homage to the newest girls on the scene, our dark skin girls produced exclusively by the Chinese retailers of what are commonly called “Fakes” by the Blythe community.


Baby Doll dress series


I did develop a new pattern of my own for BCLA, the Baby Doll Dress.  It is based on the classic little girls’ mid-century dress, also common of dolls in that era.  I chose this design for BCLA because of the link to the golden age of television, again, though I did update the look.  Other designers have made dresses similar for Blythe, as well. I have used trademark and vintage cottons, paired with silks, vintage laces, gemstones, and pearls.  Each dress is a unique expression.
 
Cabled Cardigan with Fur Collar
A small collection of the cable knit, belted cardigans with fur collars will also be available. These are hand knit of a merino/silk blend on tiny needles. They are perfect scale and are super soft with the most delicate sheen from the silk. Super fuzzy, animal-friendly, faux fur collar.


Blythe head on a Mimi Bobeck body
Dresses for plus size Blythe
Sweater, pant, and hat sets for plus size Blythe
The final pieces in this collection are a series of different items for the new, popular plus size Blythe doll.  She is a hybrid doll with a Blythe head transplanted onto a Mimi Bobeck doll body, from The Drew Carey Show doll line.  These dolls have a gaining interest but very little is available on the market for them. Each dress is a unique pattern.  I also have a few pants with knitted sweaters sets available. Some outfits even have hats! The beautiful wool is imported from Italy.  The yarns are alpaca and angora. The pink and yellow plaid is a soft textured, vintage cotton. After BCLA, I am excited to spend some time focusing on these girls and expanding the pattern selections for them.  And even offering some patterns online! 

Knit Hat Collection
Finally, I have a large selection of knitted hats. All of these hats are made from high end boutique yarns.  Some are beanies with rabbit fur pom poms. Others are a mesh slouch hat in variegated, super soft, silk and merino blend.  There are two cabled hats that are based on a hat worn by Hermoine in the Harry Potter movies. I even have one hat that is a replica of Hermoine’s Godric Hollow hat!  


So that’s my entire collection!  I will have a few additional items, such as doll prop sticks, Kaiser stands for Blythe, pink and purple striped stretch pants, cups and buttons.  


See you in LA!!!


Monday, July 16, 2018

Crafting for Blythe: Flower Purses!


Photo by Jen Furman

2 Girls + 1 Bottle Champagne = Blythe Purses!


I had a fun afternoon drinking champagne and making purses with my friend Jen.  She is the super talented Jen Spectacular!  You can check out her creativity here


Photo by Jen Furman


We decorated our purses with pretty, summery flowers. They came out so cute!


 We used stuff from my stash mainly.

All you need is scraps. But we also did a quick stop at Micheal's. We bought pretty, precut flowers in the scrapbooking section. That made it super easy because they were ready to use!


Photo by Jen Furman
We cut pieces of felt 2 1/4 inches by 4 1/2 inches to make a 2 1/4 square purse when folded in half and seamed up each side.  They are essentially just a pocket with the top open.


First, we decorated the front half with the flowers sewn in place with a bead in the center.  Jen used 1 striking flower as a point of interest.  Of course, I had to overembellish with flowers covering the whole front.  I painted the centers with pink acrylic paint before sewing them on with the bead in the center.


Then we folded the felt in half with the flowers on the outside (wrong side together) and did a blanket stitch up the sides.  Here a short video tutorial on blanket stitch for review if you need it. (It's not my video. Thank you to Red Ted Art for publishing this.)


 Finally, we attached just a bit of chain for the strap. You can adjust this to your desired length. This chain is great because it isn't open on the ends, so the thread stays secure, not slipping through the meeting point.


They turned out so darn cute! 
We had to dash to the local historic cemetery for some photos!

Photo by Jen Furman


A super fun and fast craft accessory!  Give them a try!